Lead Tracing (also known as Skip Tracing) allows you to acquire phone numbers and email addresses for a list of properties based on your search criteria. This feature helps you quickly gather contact information for outreach efforts such as calling, emailing, or direct mail campaigns.
This article walks through:
-
How to initiate a lead trace from search results
-
How to use the My Leads list
-
Understanding compliance and pricing
-
Completing your lead trace order
-
Downloading your traced results
Step 1: Navigate to Lead Pipes
-
From the left navigation menu, click the Lead Pipes / Property Leads icon (arrow icon).
-
Enter a location at the top of the screen. You can search by:
-
City
-
Zip Code
-
County
-
State
-
Specific Address
-
Step 2: Apply Filters
-
Click the Filters button at the top of the screen.
-
Use the available filter options to narrow down your list.
-
On the left side, you’ll see a summary of all applied filters.
-
Scroll through the filter menu to access all available options.
At the bottom of the Filters panel, you will see:
-
Total Results Count
-
Download
-
Export
-
Save to CRM
-
Create Direct Mail
-
Lead Trace
If you're ready to trace the entire filtered list, you can click Lead Trace here.
Option 1: Lead Trace Directly from Filters
If you want to trace all results matching your filters:
-
Confirm the total number of results displayed.
-
Click Lead Trace at the bottom of the Filters panel.
-
Proceed through the Lead Trace process
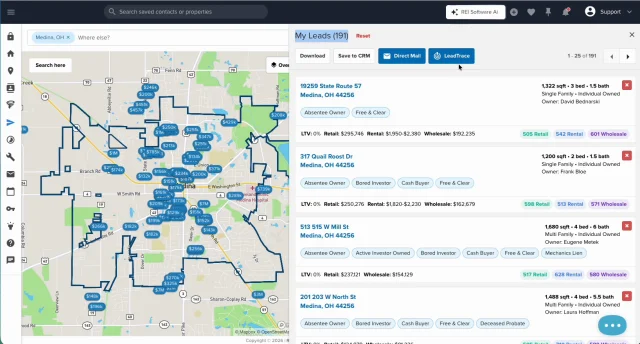
Option 2: Use the “My Leads” Feature
The My Leads button (upper-right corner) allows you to select specific properties before initiating actions like lead tracing.
Adding Properties to My Leads
You can add properties in several ways:
Method 1: From Property Details
-
Click on a property address.
-
Review the property details.
-
Click Add to My List.
-
The My Leads button will now show a number indicating how many leads are added.
Method 2: From the Results List
-
Hover over the checkbox to the left of a property address.
-
Click the checkbox to add it to My Leads.
You can also:
-
Select the entire page
-
Select the entire list
Use the dropdown arrow at the top of the results list to choose these options.
Important: Leads added to My Leads will remain there until you manually remove them.
Accessing My Leads
-
Click the My Leads button.
A panel opens on the right side of the screen.
-
You’ll see:
-
Total number of leads selected
-
A Reset button (removes all leads)
-
Action buttons:
-
Download
-
Save to CRM
-
Direct Mail
-
Lead Trace
Please Note: Any action taken here applies to all leads currently in My Leads.
-
-
Step 3: Start the Lead Trace Process
Click Lead Trace from either:
-
The Filters panel
-
The My Leads panel
The process is the same regardless of where you initiate it.
Step 4: Compliance Acknowledgment (First-Time Users)
On your first Lead Trace request:
-
You will see a Compliance Acknowledgment screen.
-
Check the acknowledgment box.
-
Click Acknowledge and Continue.
- You will only need to complete this once.
Step 5: Lead Trace Details & Pricing
You will see a summary screen explaining:
-
Cost: $0.10 per hit
-
Contact types supported:
-
Individuals
-
Corporations
-
LLCs
-
Trusts
-
-
Multiple phone numbers and email addresses may be returned.
-
DNC (Do Not Call) and Litigator list indicators included.
-
Hit rate: Up to 90%
Click Continue to proceed.
Step 6: Save to CRM (Only Available on plans with Property & Contact files)
You’ll have the option to:
-
Save results to the CRM (Properties & Contacts)
-
Name the list (for tagging purposes)
Step 7: Fresh vs. Previously Traced Records
You’ll see a slider option allowing you to choose:
-
Fresh records only
-
Or allow records traced within the past 3, 6, or 9 months
If records were previously traced within your selected timeframe, you will receive a credit instead of being charged again.
For first-time traces, select Fresh Records.
Click Continue
Step 8: Accept Terms & Conditions
-
Scroll to the bottom of the Terms and Conditions.
-
The Accept button will activate once you reach the bottom.
-
Click Accept.
Step 9: Review Order & Submit Payment
You’ll see:
-
Total number of leads being traced
-
Total cost
-
Any available credits applied automatically
Important Notes on Credits
-
If no contact information is found for certain records, you will receive a credit.
-
Credits are applied before new charges are processed.
To complete your order:
-
Enter your credit card information.
-
Click Place Order.
-
You’ll receive a confirmation message.
Step 10: Access Your Traced Results
Once your trace is complete:
-
Click the Notification Bell (upper-right corner).
-
Look for a new notification (red indicator).
-
Click the notification.
-
Download your spreadsheet file with the traced contact details.
The file will download directly to your computer.
Managing My Leads After Tracing
-
Leads remain in My Leads until removed.
-
Click the X in the upper-right of the My Leads panel to close it.
-
Use the Reset button to clear the list if needed.
Summary
Lead Tracing allows you to:
-
Acquire phone numbers and email addresses
-
Identify DNC and litigator flags
-
Receive up to a 90% contact hit rate
-
Automatically receive credits for unmatched records
-
Download results in spreadsheet format
You can initiate Lead Trace from either:
-
The Filters panel
-
The My Leads list
Both methods follow the same process.
Josh Tobias
Comments